“Order minimum amount”
– this option allows you to set a minimum amount of money per order. Open your quote generator Plugin → go to Settings and click on “Items”. You will see order minimum amount option at the top of the page. Enter the minimum amount you want to use, then hit “Save” button and you are done.
“Order total discount”
is an option that allows you to apply discount to your order. Example: if you want to apply a 10% discount to the total amount of the order that is for example greater than $1000, just enter “1000” into “$” field and “10” into “%” field, then hit “Save”.
Template Options:
Option 1: You can choose to download already preset template and edit names, formulas, numbers, descriptions to customize the template to your business needs. If you want to use template please select any template you would like to customize.
Example:
- Select “Residential Cleaning”.
- Now click on “items” again and template is downloaded. Now you can start to customize any parameter.
- You can apply “order minimum amount”, “order total discount”, “change items name”, “description” in this template. In order to modify these boxes just click on the name and type the new name/description into the box. Don't forget to click “Save”.
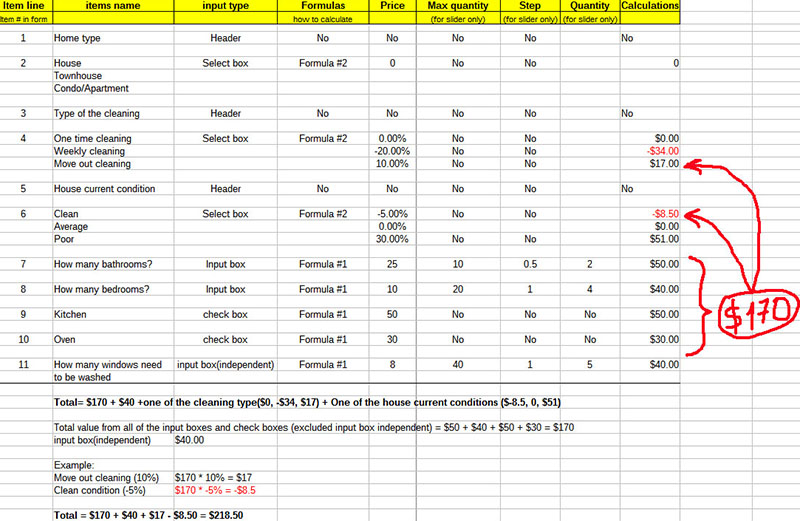
- In the table you will see option “Formula #1 #2 #3…” where you can select formula from select box which has a drop down menu of formulas.
- The next row is called “Price” where you can enter the price either in % or $ amount. If you want to enter % please enter price and % symbol. If you just want to enter amount, please enter just the number.
- Price can be entered with “-” so it will automatically work as a discount.
Option 2: To create your own form please click on “Items” and follow these steps:
- Click on the “Items”- go to “download template option” and select “clear the contents of a table” from the drop down menu. Once you clicked on the following option please click on “Items” again in order to apply the changes.
Here's an example how to create a new form for residential cleaning
- Click on the “Items”- go to “Download template option” and select “Clear the contents of a table” from the drop down menu. Once you clicked on the following option please click on “Items” again in order to apply the changes.
- Now type in “Order minimum amount”. For example, minimum amount for cleaning is $80. Type in “80” and if your company has discount for orders that are $120 or above, type in “120” into “Order total discount” and the amount of discount in %. For example, all orders that are $120 or above in value may receive a 10% discount. Therefore, type in “10” into “%” box.
- Click “Save” in order to apply these changes.
- Now you can click on “Add new item” icon
- The first option is called “New Item line” and it will have “1” already entered. Please leave this line as it is. It is there to provide numbering of the columns and will allow to move around lines if you will need to change order of items in the future.
- The next line is called “Input Type”. Click on Input box and open a drop down menu where you will see 5 options (Input box, input box (independent), check box, select box, header).
- For our example, please select “Header” first.
- The next line is called “Item name”. For our example, we will enter the name as “Get a quote instantly and book service online”
- Click on “Save New Item” and you will see a pop out message confirming that the new item has been saved. You will now be able to see a new item in your form.
FYI:
There are 2 different ways how clients can be charged for residential cleaning. They can be charged based on hourly rate or they can be charged per entire service. For our example, our clients will be charged per entire service. Your client will see exactly how much they will have to pay for the service.
In order to create a good estimate for your job I recommend you write out all the items (that you will later be adding to your form) that influence the total price. For example, your list of items may include bedrooms, bathrooms, kitchens, hallways, stairs, living rooms, etc. Other things to consider sq footage, type of cleaning and frequency. Sq footage, weekly cleaning, bi-weekly cleaning, one time cleaning, move out cleaning, windows, fridge, baseboards, etc these are also your items. The number of people as well as presence of pets may also affect the price for a cleaning. Both people and pets are also items.
* Now we will add the second item for the same residential cleaning form. You may create as many items as you need. Please follow these steps:
- Click on “Add new item”
- The first option is called “New Item line” and it will have “2” already entered. Please leave this line as it is. It is there to provide numbering of the columns and will allow to move around lines if you will need to change order of items in the future.
- The next line is called “Input Type”. Click on Input box and open a drop down menu where you will see 5 options (Input box, input box (independent), check box, select box, header).
- For our example, please select “Input box”. *Input box is a box that lets you create a slider.
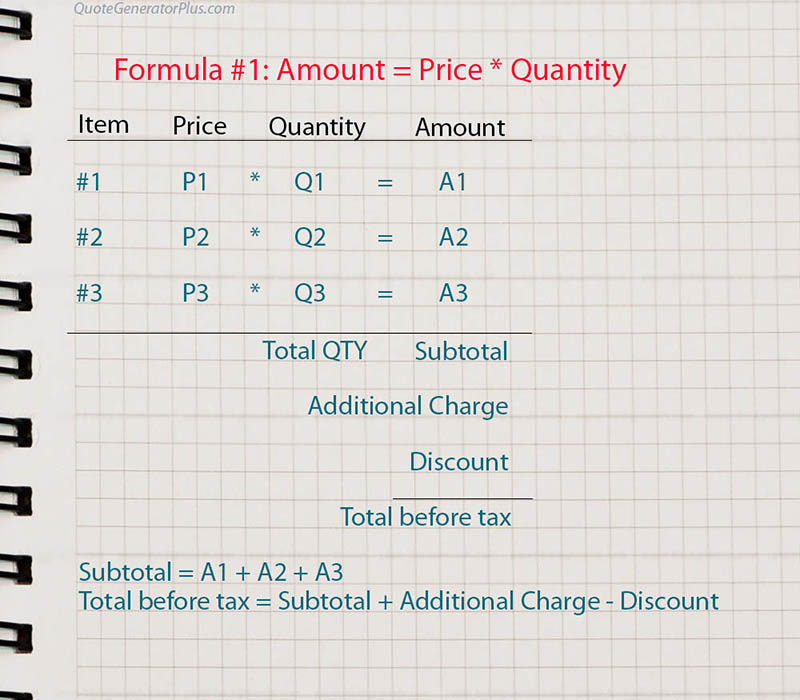
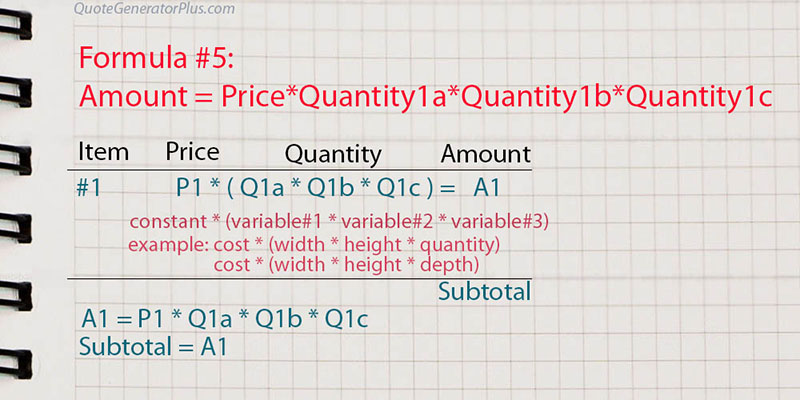
- For creating a slider you will need to use one of the formulas. In this example we will use formula#1 (Amount=Price*Quantity).
- For our example the slider is for charging client for window cleaning. You will need to enter “Item name”, let's name this window cleaning slider as “How many windows needs to be washed?” If you want you can enter additional details in description (for example, you can specify the window size or shape in the description box). For our example we will leave it blank.
- The next line is called “Price”. Please enter the price you would like to charge for one window. For our example, the price for 1 window is $7. Please enter “7”
- Now you've moved on to the line called “Maximum Quantity”. For our example, the maximum quantity of windows the client may order per cleaning services is 40. You can enter here any amount to apply to your maximum limit. For our example, usually 40 is enough for almost any house as there are rarely houses with 40+ windows.
- The next line is called “Step”. “Step” sets how many spaces the client may move the slider from minimum to maximum. With windows example, 1 step would be 1 window, so the slider will slide 1 step per 1 window. You can set “Step” to “2” and it will then slide 2 windows and so on…
- The next line is called “Image (URL)”. This option allows you to place a picture into your quote form that will correspond with your item name. For our example we will leave it blank.
- The final option available in this item set up is “Set a Quantity Discount”. This option allows you apply discount per this specific item, in our example that would be discount for window washing.
- Example: The more windows client orders, the more discount you can provide for that client:
From 3 to 5 windows price= $6.30 10% discount
From 6 to 10 windows price= $5.95 15% discount
From 11 to 20 windows price=$5.60 20% discount
You can apply maximum 10 discounts or leave it blank if you don't want to provide a quantity discount.
Don't forget to click “Save New Item” new item and you will see a pop out message confirming that the new item has been saved. You will now be able to see another new item in your form.
Now we will show you how to create “Check box” for your customized form
- Click on “Add new item”
- The first option is called “New Item line” and it will have “3” already entered. Please leave this line as it is. It is there to provide numbering of the columns and will allow to move around lines if you will need to change order of items in the future.
- The next line is called “Input Type”. Click on Input box and open a drop down menu where you will see 5 options (Input box, input box (independent), check box, select box, header).
- For our example, please select “Check box”.
- For creating a check box you will need to use one of the formulas. In this example we will use formula#1 (Amount=Price*Quantity). FYI: For check box the quantity is always equal to 1.
- The next line is called “Item name”. For our example, we want to ask client if they have any pets in the house because you may want to enter additional charge if there are pets in the house. We will enter the name as “Are there any pets in the house?”
- The next line is called “Price”. In our example, we will charge additional $15 if there are any pets that live in the house. If you were to apply this to the formula we are using, the calculation will look like this: $15 x 1(quantity)=$15
- The next line is called “Image (URL)”. This option allows you to place a picture into your quote form that will correspond with your item name. For our example you could paste an url with an image of an animal if you'd like.
- Click on “Save New Item” and you will see a pop out message confirming that the new item has been saved. You will now be able to see another new item in your form.
Now we will show you how to create “Select box”. In our example we will show you how to create “Select box” for different types of cleaning (such as one time cleaning, bi-weekly cleaning, etc). Please follow these steps:
- Click on “Add new item”
- The first option is called “New Item line” and it will have “4” already entered. Please leave this line as it is. It is there to provide numbering of the columns and will allow to move around lines if you will need to change order of items in the future.
- The next line is called “Input Type”. Click on Input box and open a drop down menu where you will see 5 options (Input box, input box (independent), check box, select box, header).
- For our example, please select “Select box”.
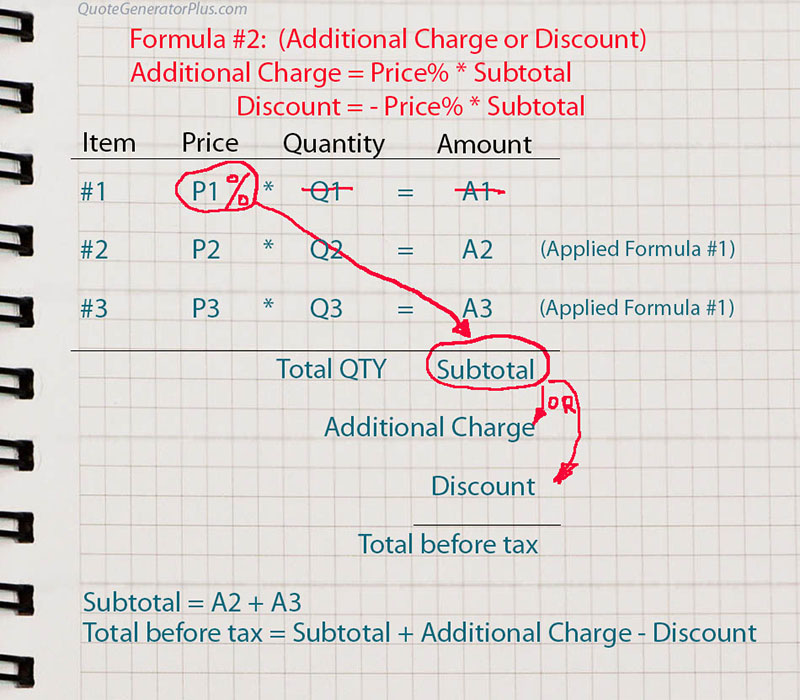
- For creating a “Select box” option you will need to use one of the formulas. In this example we will use formula#2 (Additional Charge=Price%*Subtotal) or (Discount= -Price %* Subtotal).
FYI:You will notice that in this form there are lines called “Option #1 though #5” but you can create any quantity. For the purpose of our cleaning services example we will create 3 different check boxes of 3 different types of cleaning: move out cleaning, one time cleaning, bi-weekly cleaning. Each Option# represents a different box that will be available for selection. For Option#1 we will create a base price cleaning type, which would be “one time cleaning”
Option#1
- The next line is called “Item name”. For our example, we want to create “Select box” for one time cleaning. We will enter the name as “One Time Cleaning”. In this example, a “One Time Cleaning” option is a base price for all the rest of the cleaning types and therefore it will have 0 %. There won't be added any extra charge or discount to this base price unlike other cleaning option (for example move out cleaning will have additional charge and bi-weekly cleaning offers a discounted price).
- The next line is called “Description”. You may choose to add here description of each cleaning type with details. For our example we will leave this option blank.
- The next line is called “Price” which in our example is represented in %. In our example, we will enter “0%” as it is the base price. Make sure to add “%” sign.
- The next line is called “Image (URL)”. This option allows you to place a picture into your quote form that will correspond with your item name. For our example you could paste an url with an image of a worker cleaning the house 🙂 → You have now filled out Option#1 for one type of cleaning, now we need to fill out Options#2 and Option#3.
Option#2
- The next line is called “Item name”. For our example, we want to create “Select box” for move out cleaning. We will enter the name as “Move Out Cleaning”.
- The next line is called “Description”. You may choose to add here description of each cleaning type with details. For our example we will leave this option blank.
- The next line is called “Price” which in our example is represented in %. In our example, we will enter “10%” which represents additional charge to the base price. Make sure to add “%” sign.
- The next line is called “Image (URL)”. This option allows you to place a picture into your quote form that will correspond with your item name. For our example you could paste an url with an image of a worker cleaning the house 🙂
Option #3
- The next line is called “Item name”. For our example, we want to create “Select box” for bi-weekly cleaning. We will enter the name as “Bi-Weekly Cleaning”.
- The next line is called “Description”. You may choose to add here description of each cleaning type with details. For our example we will leave this option blank.
- The next line is called “Price” which in our example is represented in %. In our example, we will enter “-20%” which represents discount to the base price. Make sure to add “%” sign.
- The next line is called “Image (URL)”. This option allows you to place a picture into your quote form that will correspond with your item name. For our example you could paste an url with an image of a worker cleaning the house 🙂
How to create items as select box options that will not influence the price?
By simply entering “0” into price line without “%” sign you will just create different selections without prices. For example, you need to know what type of home that needs to be cleaned? Is it a house, a townhouse or a condo? The prices for all these items will be “0” so the form will only allow you to collect the information.
Input Type “Input box (independent)”
Please see “Input box” for instructions. The difference between “Input box” and “Input box (independent)” options is that the second one allows you to enter price that is independent from prices for other items. This means that all items created as “Input box (independent)” items within the form are constant and are not affected by any surcharges or discounts.
Example:
|